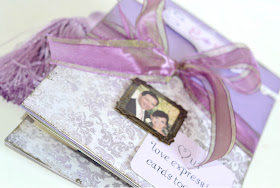
I was inspired by Something Turqoise DIY Card Mini Album to create my version of this lovely Cards Binding Book.
I have been collecting our 'Christmas, Valentine and Birthday' cards through out the years since we have been together. And when saw this site thought that I could make similar to keep those lovely cards together.
Here is a tutorial step-by-step on making what I called "Our Love Cards Binding Book.'
These are the basic supplies for this Card Binding Book
What you need,
- Varieties of craft art papers for cover and back.
- Card boards for front and back. I am using double water color paper cold press since I do not have card board.
- Scissor
- Hole puncher
- Ring binder {I purposely using large ring binder for this project thinking that I can add more cards for years to come.}
- Dot glue or stripe glue for paper craft making
- Ruler
- Your collection of cards
For the front cover
Take the biggest size of collection cards and measure the size of the front and the back cover; leaving 1/4" edge around.
Since I do not have 'heavy duty hole puncher' I punched holes on each paper and carefully mark it so that they will line up with one another.
Using stripe glue to join the two paper together {this is so the front and back cover will be strong and sturdy}
{Note; please do not mind of the paper I already used since it will be covered with other paper later on}
About a little more than half way down of the front cover glue a our design. I am using purple craft paper. {Again do not forget to punch a hole first before you glue them together}
Then glue another craft paper of your design to cover the bottom part of the front cover. The bottom paper must overlap and inch over the top paper. {Remember, the line between the top and bottom paper is where your ribbon is}
Back cover
Like the front cover, I am using double water color paper then cover with craft paper of your design.
Now cover with left over craft papers on the 'inside' of the front and back cover.
Creating antiquing on the edge of the covers
Mix yellow ochre and black acrylic paint. Using sponge lightly dab the edge of both front and back cover.
Embellishments for the front cover
- Glitter craft lettering
- Brats
- Ribbon
- Miniature metal frame for scrapbooking
- Tassles
- Small art stamp (Birds)
- Small glitter trimming {I decided not to use this !}
- Vintage cotton trimming
- 2 title embellishment that I created myself using tracing paper and a little drawing.
- I printed a small of our picture together that fits on the miniature scrap booking metal frame
Using super glue, arrange and glue all of the embellishments on the front cover as per your design.
Putting ribbon on the back cover
Line up together the front and back cover side by side and make a mark on the back cover where the line of two paper joined together on the front cover. That is where the ribbon will be placed.
Carefully make a hole through the ribbon and the back cover by using
x-acto knive. You might want to place an old magazine or foam board underneath so
you will not damage the surface you are working on.
Now that both front and back cover are finished; start putting the cards together in the ring binder start with the back cover, cards and last the front cover. {You might want to insert the tassle amongst the cards}
And last, tye the ribbon together.
Which one do you like best? The one with the black tasle or the light purple one ?
I wanted to stamp two love birds but one did not come out good. I am planning to do something else to cover up the flaw. But I will do it some other time.
All materials are available at Michael
I am so sorry that this is a quite long post with so many pictures.
I am happy the way 'Our Love Cards Binding Book' turned out to be.
Thank you !


Many Thanks for the shared this informative and interesting post with me.
ReplyDeletefloral throw pillow
baby blue accent pillow
baby accent pillows