photo website_zpsf15f51e8.png

Sunday, November 30, 2014

Mini Ribbon Christmas Tree Decoration //DIY + Tutorial//


This year my Christmas tree is going be small. I wanted them grouped and displayed together on our dining table. So I came up with these cute DIY Ribbon Mini Christmas Trees decoration.

Since our living room color is dominant with natural color - I deliberately picked natural color ribbons like cream, light brown, etc.  for the mini christmas trees decoration.

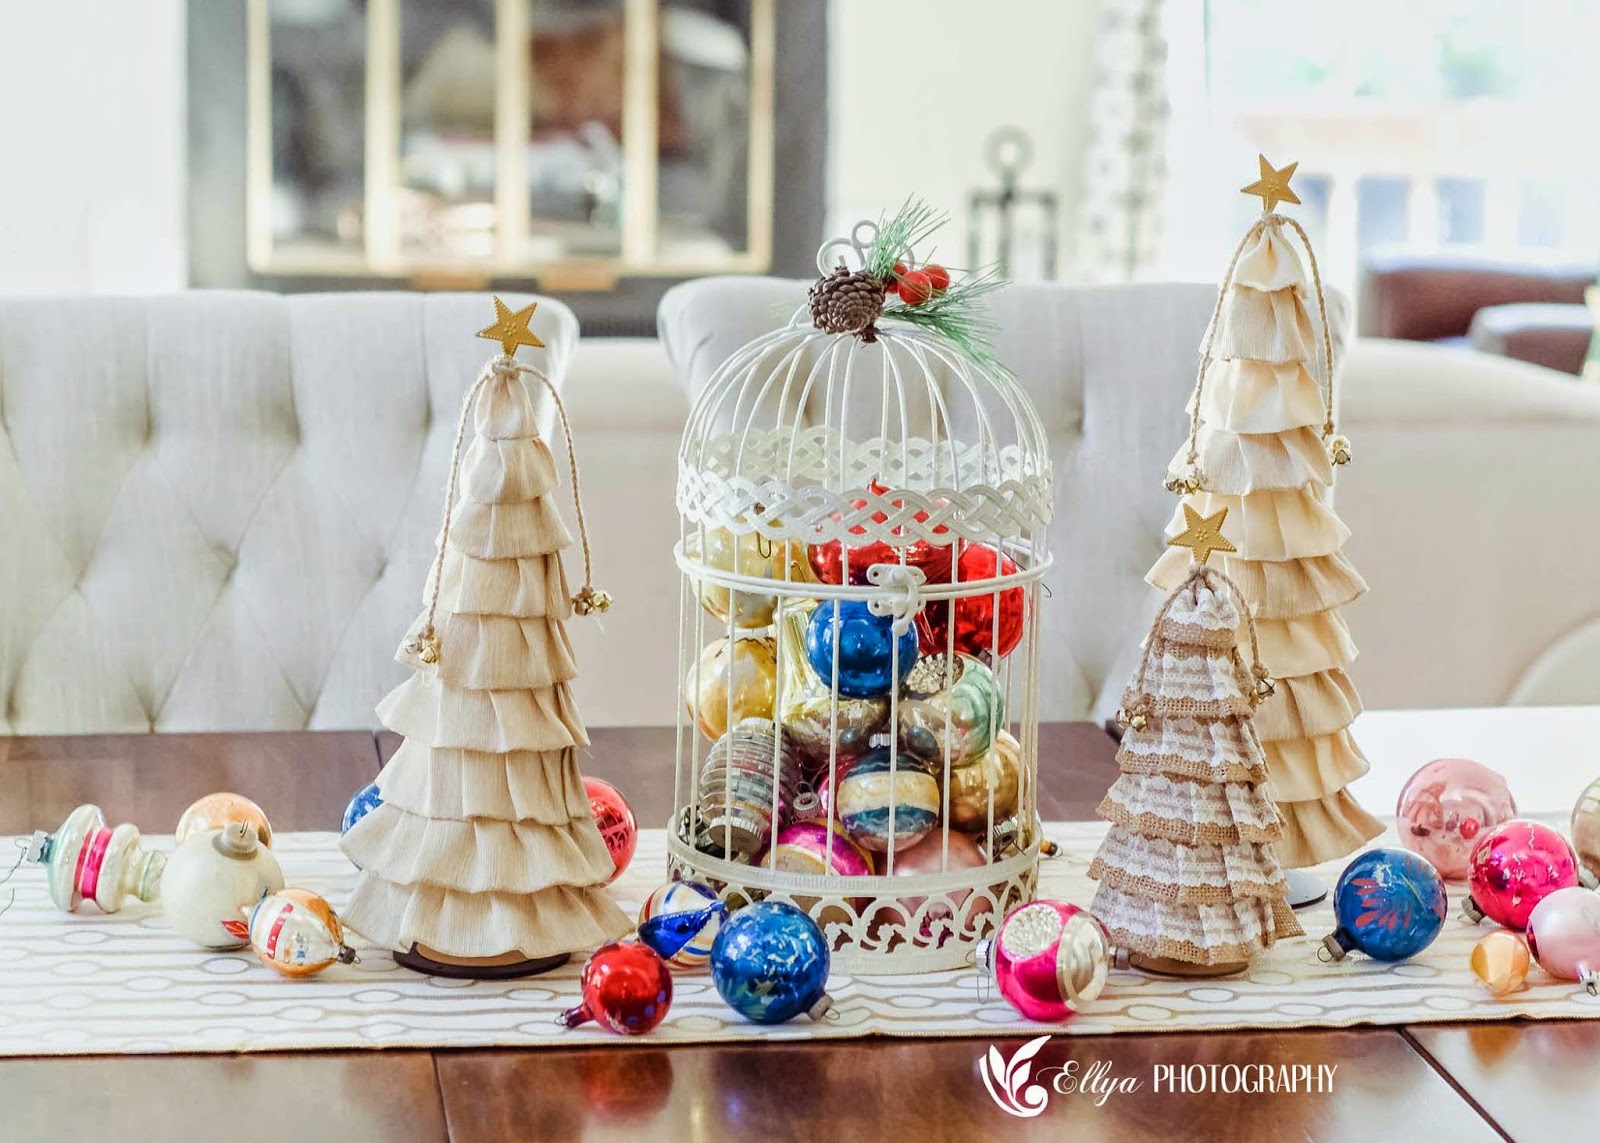
Then I remembered about my vintage christmas ornaments balls that was still packed boxes that I bought last year from a garage sale in Nyack, New York. Oh how I love these vintage christmas ornaments very much. I took them out and they are looking so pretty decorated with the mini ribbon christmas trees decoration.  Please check my old post about these vintage christmas ornament balls (here)

 One day my husband and I were driving and saw  spruce trees  a long the street. I begged my husband Steven to take a few branches as I wanted to put in a vase on the dining table. So he did. I don't usually picking plants a long the street but I am sure this time people don't mind because it was a lot of trees and Steven only took 3 or 4 little branches. I got the vase from Home Goods and the table runner from Ikea at the Holiday section.

First please take a look how are these miniature ribbon christmas trees decoration look like.


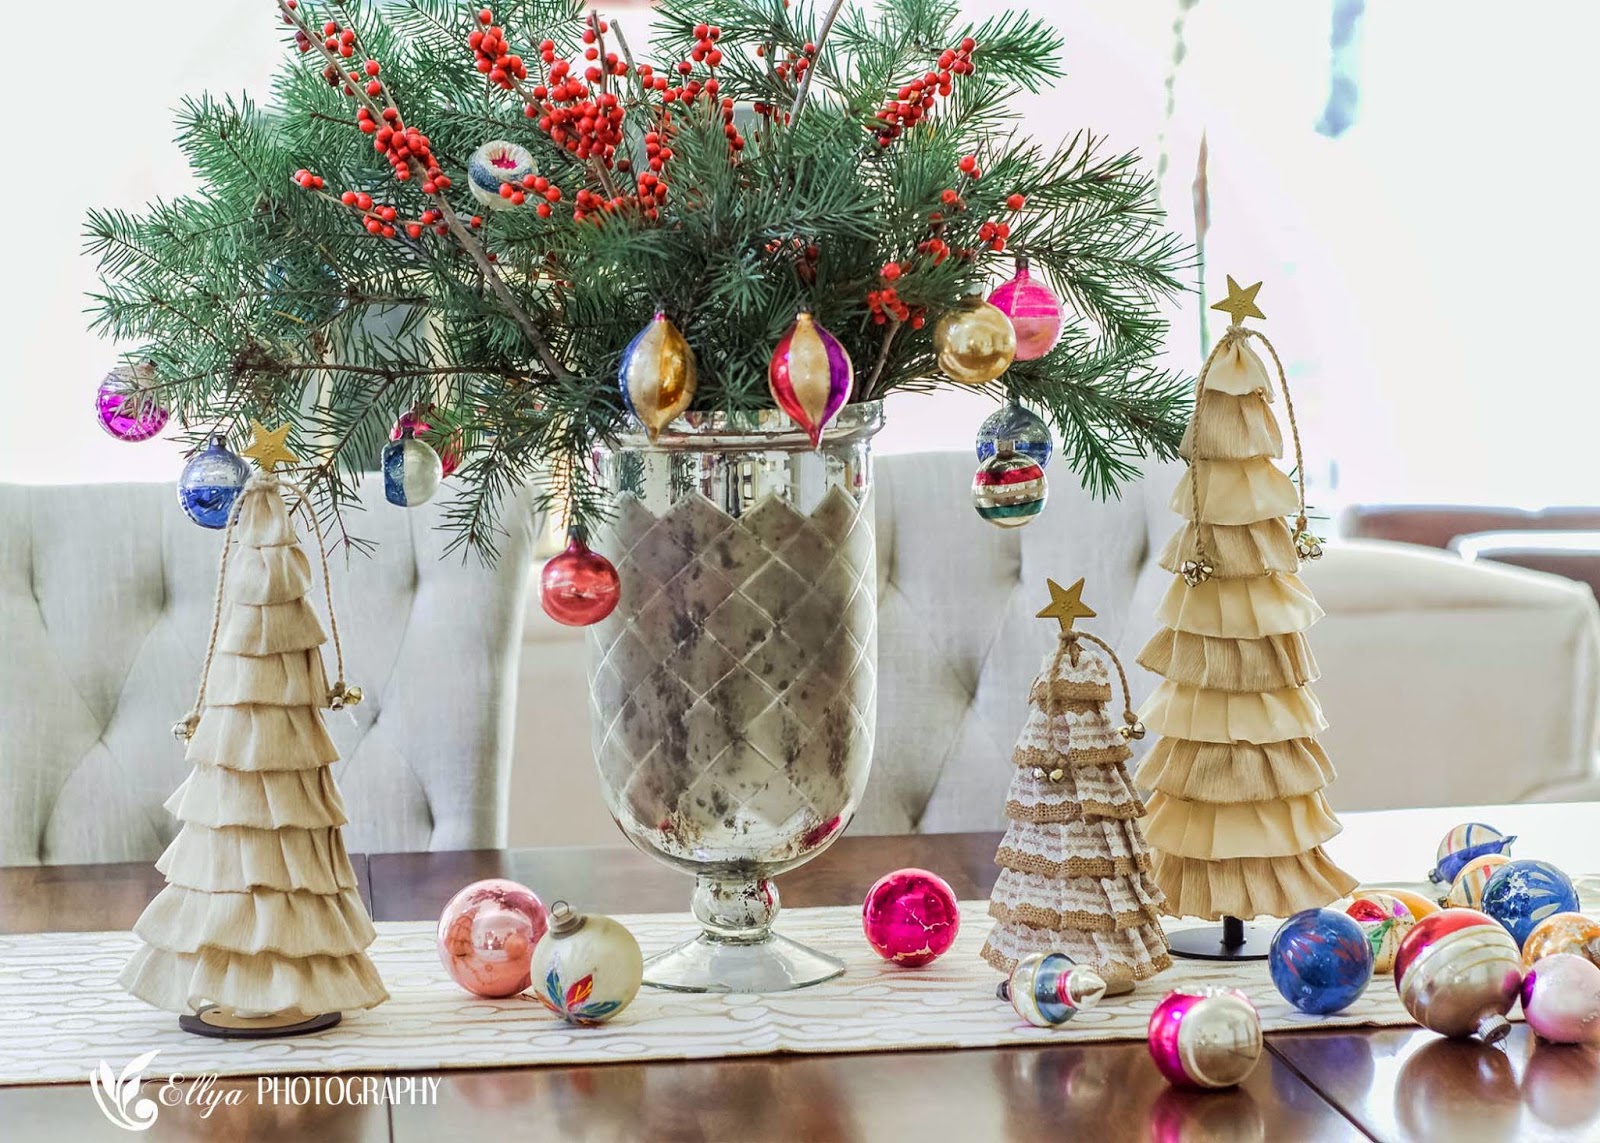
Another way to decorate as a center piece is to put the decorative bird cage filled with the vintage christmas ornament balls. Initially this was for the children holiday photography props. But I think it looks lovely as a center piece on the dining table as well. The bird cage bought from Michael and was on sale. I paid for USD 12.00 for the biggest one.


What you need.
~Assorted 2" thickness cotton ribbons. Mine bought at Michael at the USD 1.00 per roll ribon bin. I need about 4 or 5 rolls.
~ Glue gun
~ Samll christmas bells
~ Circular gift tag
~ Foam cones (different sizes) for the trees
~ Small metal star charms
~ Tooth picks
~ Empty Spool threads
~ Natural color jute cord (not in picture)
~ Chopstick (I did not use these chopstick in the end)
All materials are available at Michael craft store except tooth pick.

How to.
1. To create the very top part of the tree. Sew ribbon  by creating pleat  about 4" long. Using glue gun gather the edge to create the top of the tree and glue the bottom part to the cone. 2. Sew pleats on ribbon for the second tier and glue gun just below and under the first tier gathered ribbon. Do it all the way down the cone. 3. Insert one tooth pick on the top and glue gun one star charm on the tooth pick. 4. Take empty thread spool and using glue gun - glue it on the center of the circular gift tag (if the tag is thin then double it using the glue gun). 5. Then glue the top of the thread spool to the  bottom of the cone. 6. Take a good length of jute cord and tie both ends with bells. And tie it to the top part of the tree 1/3 down. Then it is done. Note: my sewing machine has broken so I sewn the pleated on the ribbon by hand. It was not difficult as I thought it would be. It took more time but I was patient enough so in the end I am very happy with the result. 

Thank you so much for stopping by!


Tuesday, November 18, 2014

Tips About Props for Children Christmas Photography


I always very excited during the  time close to a Holiday like now. Prior to this and a few weeks before, I started to look for props to do a Holiday theme photo shoot indoor. I'd be sure that I have what I need in order to do a Christmas indoor photo shoot. This mean I must have ;
~ Backdrop
~ Lighting
~ Crhistmas props
~ A  space near a window or door with a good natural light source
~ SD card 
~ Announcement about the mini session photo shoot on Facebook and I also put on Craigslist.com.

When I know I have these ready; I can start booking clients.  It is just me that I like start much earlier than people anticipated. The reason is I like to give my client enough time for them to order and pick carefully their Holiday cards if they choose to do so.


~~~~o0o~~~~ 


BACKDROP
I bought my backdrop from Ebay (here). I am not ready to spend a good quality backdrop since I am new shooting indoor. But so far the backdrop does the job perfectly.  Before I bought the backdrop; my husband Steven made me a backdrop from pvc pipe got it from Home Depot. This backdrop came in handy.  And for one particular shoot; I need two backdrop to hang the props. In the future I am planning to buy the same professional looking one from Ebay. But with only USD 15.00 you can create a backdrop as well. Off course you need someone who can cut to size to create the pipe into a perfect photography backdrop. And I can assure you it is not that difficult.

LIGHTING
I also bought the lighting on Ebay. Again, I love them very much. For the price what I have paid for, I am one happy photographer shooting with these soft lighting umbrella. (here) I like to be prepared since the weather is not always good. Good lighting makes a huge different in the picture. So I like to prepapare myself in advance.

CHRISTMAS PROPS
I don't know this idea just came into mind that I want a strings of Christmas ornaments balls as a backdrop. So I bought 50 Christmas balls in one plastic box for USD.9.90 at a Dollar store near my house. I tied them with 4 or 5 inches a part on a clear plastic jewelry string bought from Michaels. Just to warn you that this took me almost 2 hours to do. But after the last 3 strings I got the hang of it that I did it quicker. You want it to cover the entire white cloth backdrop horizontally. And I hung these strings of Christmas balls on the pvc back drop placed about 1 feet in front of the white backdrop cloth.

I also bought other toys related to Christmas like teddy bear bought at Ikea. A small christmas tree decorated with christmas ornaments bought at Ikea. A  few fake presents also good as props. Usually these present won't stay pretty very long as the kids will pull the bow but that is the beauty of photograph toddlers because they are curious and often you will ended up with good pictures as if they are opening the real presents.

Also as seen on last pictures; I also bought a small white christmas lighting. Again instead of hanging strings of christmas ornament balls I hung strings of these lighting. You might need 4 boxes of 100 light bulb each. They cost about USD 4.99 per box. I got them at a Dollar store as well.

SPACE
If you do not have a studio dedicated just for photography; you need an extra space about 10 feet by 15 to 20 feet open space to put the backdrops and where you are shooting from.

And a good SD card. I bought mine from Best Buy.

ANNOUNCEMENT on Facebook.
There are ton of samples on google search (here). If you are good with basic Photoshop, you can do it yourself. I also look for graphic images on graphicstock.com to decorate the announcement card.
I created the announcement the next day I took the children's photo so that I will be on time to announce the mini session. I just like people to be prepared way a head so that they can take time to create the holiday cards.  I asked the parents if it is okay for me to post 2 or 3 of their pictures and use one of them for my Children Christmas mini session announcement on Facebook or have it written as a part of the contract. Usually they do not mind at all. Then I created using Photoshop Elements. I also put the announcement on craigslist.com a long with 2 pictures of the kids.


Like mentioned before, the metal backdrop bought from Ebay is where the white cloth is hanging. And the second backdrop stand from pvc is standing  in front of it where the strings of christmas lighting or strings of christmas ornament balls are hanging. The props must cover the entire white cloth horizontally. I did not cover the lighting a cross  as I was just testing to see how the pictures turn out to be.


 Soft box lighting will be put at 4 and 7 o'clock from the subject.


 Create different sizes of fake presents with different pattern/color of paper christmas wrap. Tie them neatly and nicely with a pretty ribbon.
Having different sizes with different paper wrapping creates drama and a feel of christmas mood. Try not to put too much props because they can be distracted and will take away the beauty of the subject(s); in this case, the kid(s).


Miniature christmas tree is lovely. But be prepared that the kids will pull the ornaments out of the tree. You will have to decorate the tree again for next round of a photo session. Remember to have a break so that the kids can have a drink or snacks. And continue on after.


I have not incorporated the lighting background on any kids. This is going to be for my next client. But it is always good to test it before hand. Playing with the aperture is crucial because it has a great impact on the look of the light itself. Below picture was taken with slight larger aperture like f/2.8. You can clearly see
the wiring of the light. The larger the aperture is the clearer the background will look.


And below picture taken with approximately f/2.0. The wiring less noticeable.

On below picture I deliberately lower the exposure. The reason is because I wanted you to see a string of clear plastic stars hanging next to the second row of lighting from the left right above the teddy bear left side head. I am planning to put many more strings of these clear plastic stars alternate them with the lighting. Experimenting with different kind of material is always good. You can store away the props for next year.


And here is the lighting I am going for. It creates dapple circular lights and it is so lovely. But this will perfectly work with lowest aperture like f/1.8

A box of 100 white christmas light is USD 4.49. And the clear plastic stars contain 10 stars per pack is USD 1.00 at a Dollar store.

Remember always plan your session a head. And don't forget to test it. Use a toy or an object to replace the kids. This way you will see what works and what is not. Think outside of the box to create props and backdrops. The sky is the limit!


Thank you so much for stopping by!
Happy Tuesday Everyone ?


ELLA + CHRISTOPHER + THOMAS //Children Christmas Photography Indoor//

This is the first time I have taken pictures of children for a Holiday theme.  I must admit that I love doing it so much.

Taking picture of kids within the age of 2 to 5 is not the easiest. But somehow I love capturing children's expression when they are happy or cranky. It takes a lot of patience when taking picture of children in these age bracket because they aren't always in the best mood.

When they seems not want to cooperate - you as a photographer must not force the kid to pose or do what you want her/him to do. The trick is try to get their 
attention like giving them a new toy, try to act funny (I always ask the parents to do this), and by calling their name. So you must always have an extra soft toy with you but do not let them see it all. You can give it to them one by one to buy time so that they always feel surprise and excite seeing the new toy. Inform the parents that they must have their meal just before the photo shoot it always help. Because feeding the kids during the photo shoot will give you an extra time to edit because you will finally see their picture with some crumbs on their lips. This happened on one of the children's pictures. I did the painstaking job, brushed off the crumbs out of his mouth during editing. Telling the parents to feed the kids at home  before shooting is now my top priority.

Toddlers are the most adorable human being to be photographed. I love their candied expression. That's why as I mentioned above sometimes you will get a great shot when you let them do what ever they wanted to do. It unexpected and the result always the cutest.

All and all the shooting was a fun day for me.  I selected and created the backdrop myself (I will talk more about this on my next post).

So take a look at these adorable kids. First group are Ella and her brother Christopher. And the second group is Thomas.


Thank you so much for reading!


Friday, November 14, 2014

Vintage China Table Setting

I have been collecting vintage china for 10 years. But for the past 3 years I am slowing down quite a bit. Not only they are hard to come by but right now I have  quite a lot of them. I particularly love the blue band one. Any china designed with a blue band and floral I seems to love very much. I used to scour Ebay to bid one by one until where I am now. But I found that it is getting harder and harder to get the pretty blue band china now a days. If there is, which is quite rare it is quite costly that I can't even afford any more. Last posted here and here.

Over time, I collected many dinner plates, salad plates, bowls, desert plates, serving dish, etc. Although they are not in the same pattern; they all are blue in color. I really like it that way. It is unique and pretty when put them together as a table setting for a dinner enough for 6 or 8 people like showing on these pictures. The key here is that I keep the color all in blue to tie them together. Surprisingly the table looks really pretty.

This dinner table setting is for 6 six people. It was during the time when my son and his girl friend was visiting us. We invited a couple that we are quite close with to introduce my son 'Buck' and his girl friend to them.

The truth is for me, entertaining dinner at home is very important. I want the food as equally good as the table setting. Thank God that night everyone loved my cooking. That they kept on mentioning that each course was so delicious. Even my son and his girl friend kept on coming to the kitchen and spoon some of the dishes out before the guests are coming.

Days after dinner they were eating the Beef Brisket left over until it was all gone.

Planning a dinner like this one is very exciting to me. I love planning the menu, buy the flowers as the center piece, setting the plate, etc. I do these days before the dinner time. And 2 days before I started to buy ingredients. And a day before I started to set up the table. This way 1 day before I can start to cook some of the meals. That leave me only 1, 2 or 3 meals to cook during the dinner day. 

I was very excited because my mother in law gave me this silver ware that I totally had forgotten about. She gave me when were still living in our old home. Prior to this dinner I told my husband that I need to buy a new silverware. He then told me why don't I use the silverware his mother gave us. I was so thrilled and happy to see it again. It was so beautiful. I do not know anything about antique silverware but Steven my husband told me that this silverware is  very expensive. I was curious that I checked on Ebay and I was shocked by the price. I could not believe that silverware can cost that much! I am honored to own it and that this silverware used to belongs to Steven's grand mother; his mother's mother.  This silverware really gives the vintage/antique luxury to the whole dinner table setting. 

I also collected wine goblets that has an etching to them. I love Fostoria brand. But it is getting more and more costly on Ebay.  I can only afford 2 or 4 of them. So they are not in a set.  To me, they do not need to be in a set. I think it is more interesting that way. Overall, I really love the table setting.

So what do you think? Would you use different mix and match dinner plates, salad plates and bowls like I do?


Have a great week end Everyone?


 photo Linkedto_zps7da192d4.jpg

Monday