photo website_zpsf15f51e8.png

Monday, October 31, 2011

Journal

Journal is a positive way to express yourself and the good thing is you can write or put what ever images your heart desire on the pages. The hardest part for me is to write journal every single day, but you do not have to. There are so many ways and style as to what your journal pages are going to look like. So it is entirely up to you.  I am starting with a small note pad of my "what to do list." It contains the most important projects that I need to have it done. Originally the note pad is what I jotted down by handwriting them, then I started to use it as an art journal exercises  where I can create color, stamping, gluing images, other techniques I might want to use. So there is no mistakes because it is only for yourself and for the most part you are likely to create a lovely mistakes by accident and you ended up liking it. Here are some exercises of making art journaling I found in youtube.

http://www.youtube.com/watch?v=ZUjgHyeVYQQ&feature=related

http://www.youtube.com/watch?v=CzzHuoIYEzQ&feature=related


I will show you that over time I collect lots of bits and pieces for my journal like, candy wrappers, beautiful/interesting images tear sheets from magazine, I collect hang tags from brand new clothes or jeans, I collect hotel room magnetic keys, beads, trimmings, etc. 
 
So I started like this one; my small  3-1/2" x 5-1/4" note pad.


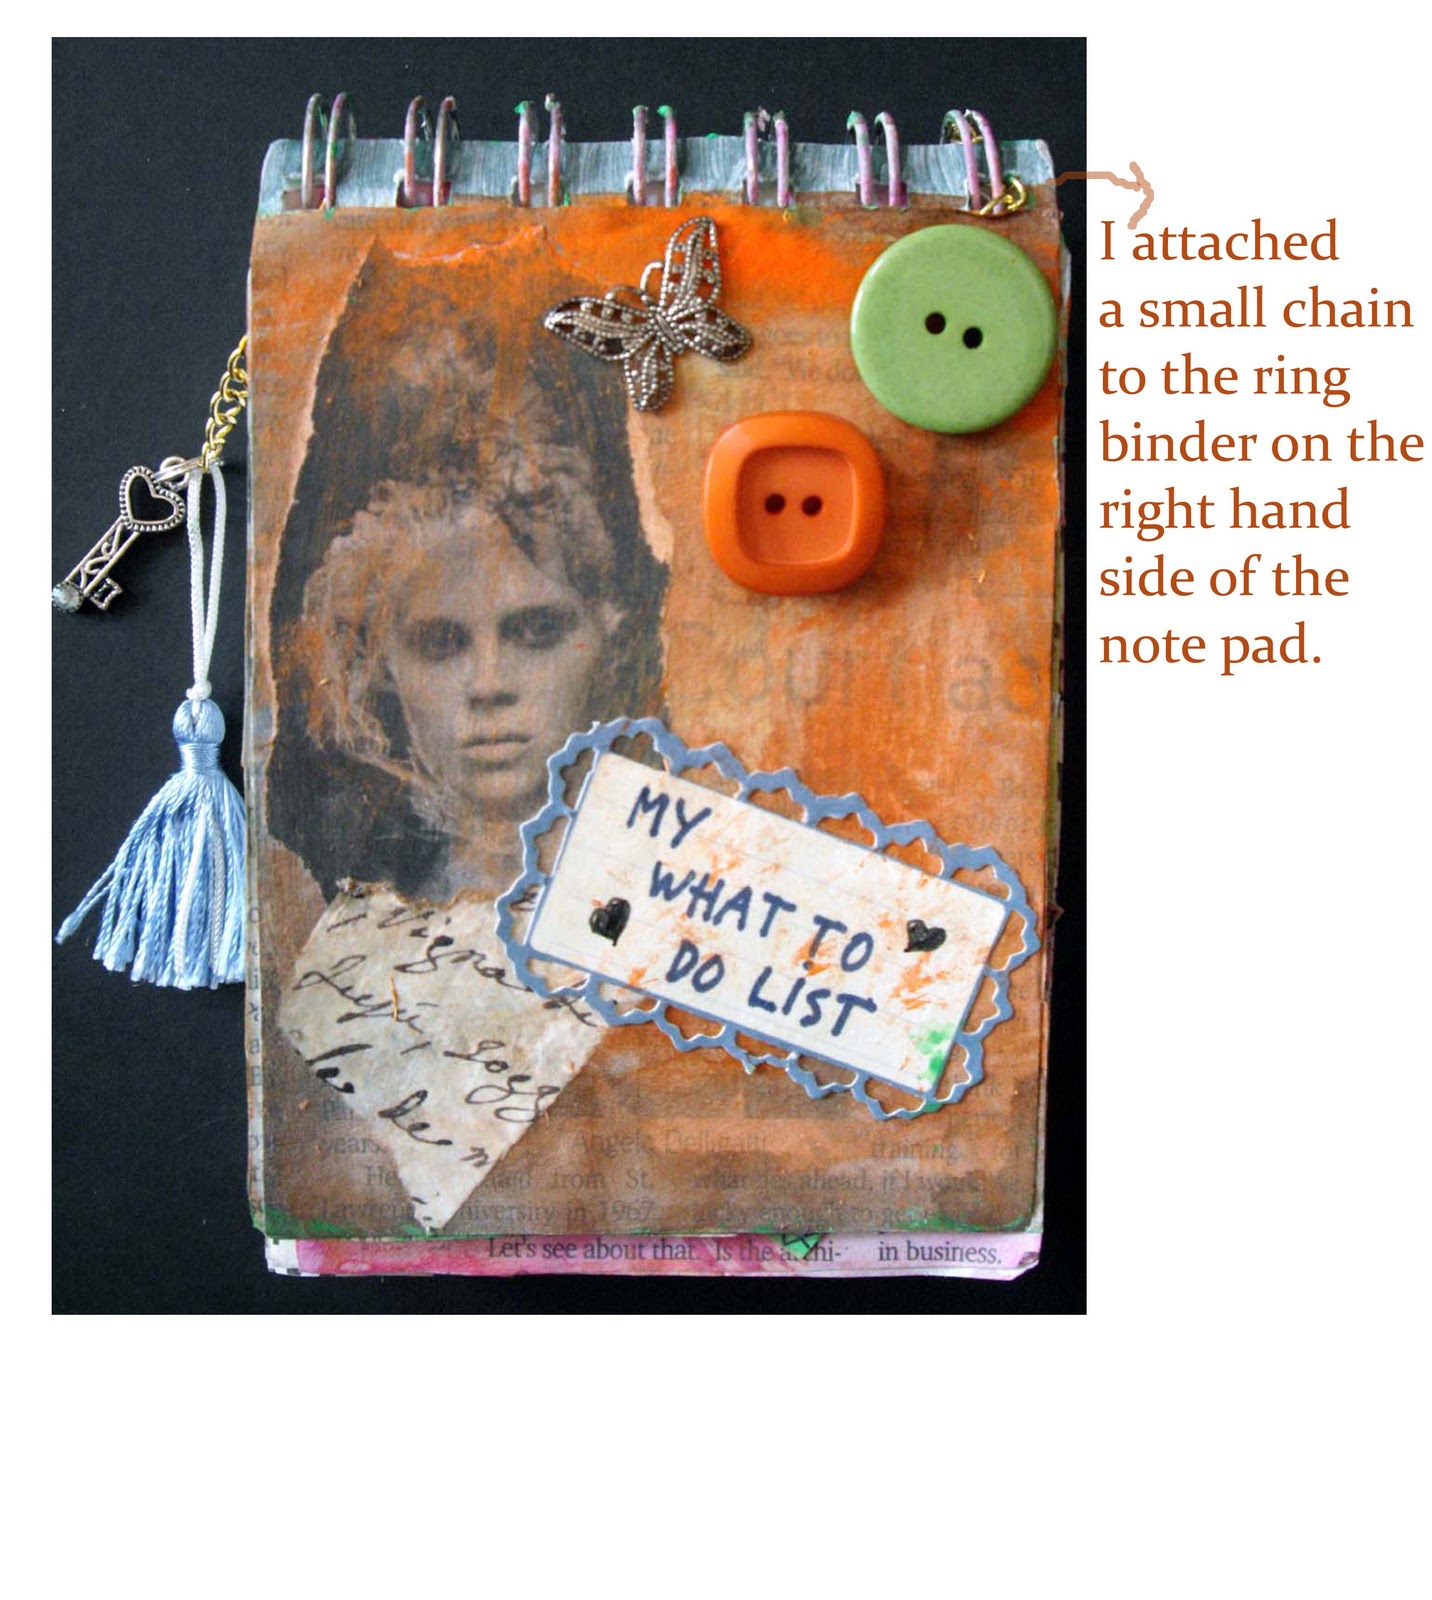
I attached necklace fastener and hooked it on the ring binder to mark for that particular page. Add 2" of chain and attached one or 2 jewelry embellishment; here I have a small blue tasle and decorative small key for scrap booking.


Here are some of my paper ephemera that I have been collected over times.


I love the above images. There's a sense of dreamy and romance....! They are from various magazines.


So those are some of my journal bits and pieces that I have been collected.


I keep all of those ephemeras in this plastic box.

Have you wrote a journal lately ?

HAVE FUN....!!

XOXO,
      Ellya

Sunday, October 30, 2011

Jewelry Packaging {New Look}

I always looking for new ideas on how to improve my day to day art and craft at home. The best way to look and find those tips is looking and search through the internet. I was so inspired by some of the clever ideas so I took some tips and made a new look of how to package my jewelry in the future. 

First I have to make all the necessary items that support the jewelry for safety and marketing. I looked for the best and cheapest nice way to make a jewelry box but I could not find the one for my strand necklace. Strand necklace needed bigger box and some of the lovely, beautiful tips I found are for small jewelry, hence it only needs a small box. So in Michael I found the perfect box ready made for only US$0.79/box. Perfect !
Then last night I came up with a design for my  name card, hang tags and thank you note. All done in Photoshop in computer by ME; printed on a printable name card stock I found at Staple.

In the past I have been thinking about tying a vintage lace trim around my jewelry box. So a few days ago I found 25 yards vintage ivory lace trimming for only  (believe it or not !) US$ 5.75 plus shipping which only a few Dollars through Ebay, yess....for 25 yards. I could not believe what I saw so I asked Steven my husband to come look on the computer monitor to confirm it and made the calculation of how much it's cost per yard finally. He said "Yupp, it is for 25 yards alright !" I am set. Clicked "Add To Cart". Paid. It's now mine ! I love shopping in Ebay !

You can find some of those lovely tips on how to package, create hang tags, earring cards here I found in the internet. Those tips are quite adorable !
http://www.home-jewelry-business-success-tips.com/packaging-jewelry.html

http://artandclasp.blogspot.com/2010/07/how-i-package-my-jewelry.html

So now it is on it's way here. But for this photoshoot; I found an old vintage lace trimming I bought a long time ago in my trinket box. So just to give you an idea on how it will look like when it arrives at it's destination; my home


This is how it will look when it arrives.
All of the 'must' craft idea that goes along with the jewelry.


Then jewelry wrapped in tissue paper and put amongst stuffed tissue paper in the box and ready to put in a shipping box. {I was thinking to make and sew a simple velvet pouch for it; but I will do it next time. For now this is quite lovely !}

XOXO,
       Ellya

My Facebook Page

Hello,

First of all thank you for all of my friends who clicked the Facebook Like Button on my blog. I thank you all for that ! But I know you might not be able to see the curiositaellya Facebook Page just yet. I do not know why ! I guess, I did not set it up right (I only suspect.) I am trying to fix this asap. Please be patient; as I am not familiar with all of these buttons and codes, etc. I am learning though; and so far I have learned quite a bit ! I can not wait to post my next stories. From the bottom of my heart thank you for your support. Stay tune !


Wednesday, October 26, 2011

Picture Gallery in Florida Home

I always enjoy and comfortable to paint using gouache. I started using it when I was working for  textile company designing and painting their textile motifs by hand. Then I started painting a series of Renaissance decorative motifs for myself and for my own enjoyment. When we bought our winter get away home in Florida, I knew I had to create a picture gallery above the sofa in our living room with my gouache art works.

I bought the frames from various thrift stores around the area. I knew that I do not want to go to a professional frame store to have it done; I wanted the vintage look plus I enjoyed mounted them on an art board so that it can go right away into the frame and onto the wall all  done by myself. I scoured the thrift stores looking for the right frames that goes with the art works. And I found them in Salvation Army, Goodwill, and some are new like from Home Goods. I also must design the size of each picture with it's frame; as I want to have a sense of balance when grouping them together, like big and small; old and new.

So here they are !


Until next time !

XOXO,
     Ellya

Women Whom Are Blogging That Inspire Me

So we (Steven my husband and I) arrived in our 'get away from winter home' in Delray, Florida. As usual I am continuing decorating the small condo a little here and there. And as always I like to stop by in Barnes and Noble having a cold moccha. (My favourite by the way!) I love flipping magazines pages or books looking for inspiration or just simply looking at the beautiful pictures. When I saw the two magazines "Artful Blogging Visually Inspiring Online Journals and "Where Women Create Inspiring Work Spaces of Extraordinary Women" I knew this the kind of reading I exactly need. Immediately I felt like a little child in a candy store. I grabbed them and headed out to cashier.

Okay.....my blog does not have five thousands people as followers. In fact; none but my husband. But that's because I have not done anything to promote my blog. For now I am overwhelming with the gadget and gizmos and what to post in the blog itself. So I will give it a time for it to grow.

I am totally touched by some of the stories about how these women changed their career from working for a big corporate company to become an artist; a successful artist and a successful blogger. As I continue reading the magazines at home and in the airplane on the way back to New York; I am totally inspired by their stories.

So for Beginners Bloggers like myself  out there; I can only suggest you pick up these two magazines, I promise you will want to blog even more !! 

Check it out !


I love being inspired, always !
Until next time.......

XOXO,
         Ellya

Brass "Pear" Ornament DIY

I found this brass pear ornament in a thrift store in Delray. I knew it right away I can give it a new look by putting a new coat of paint. Check it out the DIY step by step of this brass pear.


The original look of the Brass Pear Ornament.


The new look !

Look around, you might want to give an old item a new look by giving them a fresh bright color of paint.

Until next time,
Ellya

Tuesday, October 25, 2011

TeaStand DIY

I have been thinking about showing you on how to drill my tea stand. Now I am going to show you step by step on how to drill those pretty plates turning into a beautiful cake stand for you high tea gathering with friends and family. But first I want to take you to the history of this lovely, beautiful, elegance and yummy 'English HighTea'  Now that you already know about the story on how  Hightea became a popular drinking tea ceremony the English way (oh...what ever happened to the French; and thanks to Anna Maria Stanhope; we love "low tea" as well with pickles, cheese and bread !), I am going to take you to the history of English 18th century pottery/china that we all so much love. And of course these are the brands of those beautiful English china we are now collecting and that I have created  into a 'tea stand.'

Okay, now you know pretty much about these pretty little plates we hunt all over vintage stores; let's get to the making of my tea stand !


Drillbit can purchased at Etsy
Power drilling tool belongs to my husband and from HOME DEPO


Metal Rod Tea stand is from Ebay

Oh how lovely my own creation of Tea Stand !! From Ellya's Etsy store
XOXO,
         Ellya